概要
こんにちは。アーティサン株式会社の木戸です。
本記事では Angular Material の MatTable で異なる構造のデータを 1 つのテーブルで表示する方法をご紹介します。
複数の API からのレスポンスを 1 つのテーブルで表示する場合などに利用できます。
また、動的に対応するためテーブル定義を外部に持つ形になります。
そのため、ハードコーディングによる再利用性や保守性の低下を避け、柔軟性やページの再利用性を保ちつつ、保守性の向上に役立ちます。
Angular Material、MatTable とは
- Angular Materialとは、マテリアルデザインを用いた UI を提供する、Angular 用のコンポーネントライブラリです。
- MatTableとは、Angular Material 内のテーブルコンポーネントです。
環境
- Angular: 12.0.3
- Angular CLI: 12.0.3
- Angular Material: 12.0.3
- TypeScript: 4.2.3
実装方針
本記事では 1 つのコンポーネントを使用し、各パス毎に固有のデータを渡し、
渡したデータによって表示するテーブルの構造を変更する形で実装します。
- ルーティングの各パスに渡すデータを設定
- 表示するテーブルの構造とデータを定義
- コンポーネント(.ts)にて渡されたデータから表示するテーブルを選択する
- コンポーネント(.html)にて、選択したテーブルを表示する
実装
ルーティングの設定
path: a, path: b のそれぞれで違う構造のデータを MatTable で表示します。
そのため、各パスに tableName のデータを渡します。(12 行、19 行)
// table-routing.module.ts
import { NgModule } from "@angular/core";
import { RouterModule, Routes } from "@angular/router";
import { DynamicTableComponent } from "./components/dynamic-table/dynamic-table.component";
import { TableComponent } from "./table.component";

const routes: Routes = [
  { path: "", component: TableComponent },
  {
    path: "a",
    component: DynamicTableComponent,
    data: {
      tableName: "a",
    },
  },
  {
    path: "b",
    component: DynamicTableComponent,
    data: {
      tableName: "b",
    },
  },
];

@NgModule({
  imports: [RouterModule.forChild(routes)],
  exports: [RouterModule],
})
export class TableRoutingModule {}
データ定義
テーブルのカラム定義を Columns 型とし、
def キーで実際のデータを取得する際のキー、name キーでページに表示する列名を指定します。(19-24 行、39-42 行)
// table-data.ts
export interface PeriodicElement {
  name: string;
  position: number;
  weight: number;
  symbol: string;
}

export interface Transaction {
  item: string;
  cost: number;
}

export interface Columns {
  def: string;
  name: string;
}

const COLUMNS_A: Columns[] = [
  { def: "position", name: "位置" },
  { def: "name", name: "名前" },
  { def: "weight", name: "重さ" },
  { def: "symbol", name: "シンボル" },
];

const DATA_A: PeriodicElement[] = [
  { position: 1, name: "Hydrogen", weight: 1.0079, symbol: "H" },
  { position: 2, name: "Helium", weight: 4.0026, symbol: "He" },
  { position: 3, name: "Lithium", weight: 6.941, symbol: "Li" },
  { position: 4, name: "Beryllium", weight: 9.0122, symbol: "Be" },
  { position: 5, name: "Boron", weight: 10.811, symbol: "B" },
  { position: 6, name: "Carbon", weight: 12.0107, symbol: "C" },
  { position: 7, name: "Nitrogen", weight: 14.0067, symbol: "N" },
  { position: 8, name: "Oxygen", weight: 15.9994, symbol: "O" },
  { position: 9, name: "Fluorine", weight: 18.9984, symbol: "F" },
  { position: 10, name: "Neon", weight: 20.1797, symbol: "Ne" },
];

const COLUMNS_B: Columns[] = [
  { def: "item", name: "アイテム" },
  { def: "cost", name: "コスト" },
];

const DATA_B: Transaction[] = [
  { item: "Beach ball", cost: 4 },
  { item: "Towel", cost: 5 },
  { item: "Frisbee", cost: 2 },
  { item: "Sunscreen", cost: 4 },
  { item: "Cooler", cost: 25 },
  { item: "Swim suit", cost: 15 },
];

export const TABLES = {
  a: {
    data: DATA_A,
    columns: COLUMNS_A,
  },
  b: {
    data: DATA_B,
    columns: COLUMNS_B,
  },
};
コンポーネントの実装(.ts)
ActivatedRoute からパスに渡されたデータ(tableName)を取得し、表示するデータとテーブル定義を選択します。(30-32 行)
// dynamic-table.component.ts
import { Component, OnInit } from "@angular/core";
import { MatTableDataSource } from "@angular/material/table";
import { ActivatedRoute } from "@angular/router";
import {
  TABLES,
  PeriodicElement,
  Transaction,
  Columns,
} from "../../constant/table-data";

type Element = PeriodicElement | Transaction;

@Component({
  selector: "app-dynamic-table",
  templateUrl: "./dynamic-table.component.html",
  styleUrls: ["./dynamic-table.component.scss"],
})
export class DynamicTableComponent implements OnInit {
  public dataSource: MatTableDataSource<Element> =
    new MatTableDataSource<Element>();

  public columns: Columns[] = [];

  public rowColumns: string[] = [];

  constructor(private activatedRoute: ActivatedRoute) {}

  ngOnInit(): void {
    this.activatedRoute.data.subscribe((data) => {
      const tableName = data.tableName as keyof typeof TABLES;
      const table = TABLES[tableName];

      this.dataSource = new MatTableDataSource<Element>(table.data);
      this.columns = table.columns;
      this.rowColumns = this.columns.map((c) => c.def);
    });
  }
}
コンポーネントの実装(.html)
に*ngFor ディレクティブを使用し、動的にカラムを作成します。(4 行)
その際、matcolumnDef を[]で括り、column.def の値をバインドします。(4 行)
また、{{ element[column.def] }}と記載し、テーブル定義データの def キーを利用し、element から特定のデータを取得します。(6 行)<ng-cotainer>
<!-- dynamic-table.component.html -->
<div class="table-container">
  <table mat-table [dataSource]="dataSource">
    <ng-container *ngFor="let column of columns" [matColumnDef]="column.def">
      <th mat-header-cell *matHeaderCellDef>{{ column.name }}</th>
      <td mat-cell *matCellDef="let element">{{ element[column.def] }}</td>
    </ng-container>

    <tr mat-header-row *matHeaderRowDef="rowColumns"></tr>
    <tr mat-row *matRowDef="let row; columns: rowColumns"></tr>
  </table>
</div>
実装結果
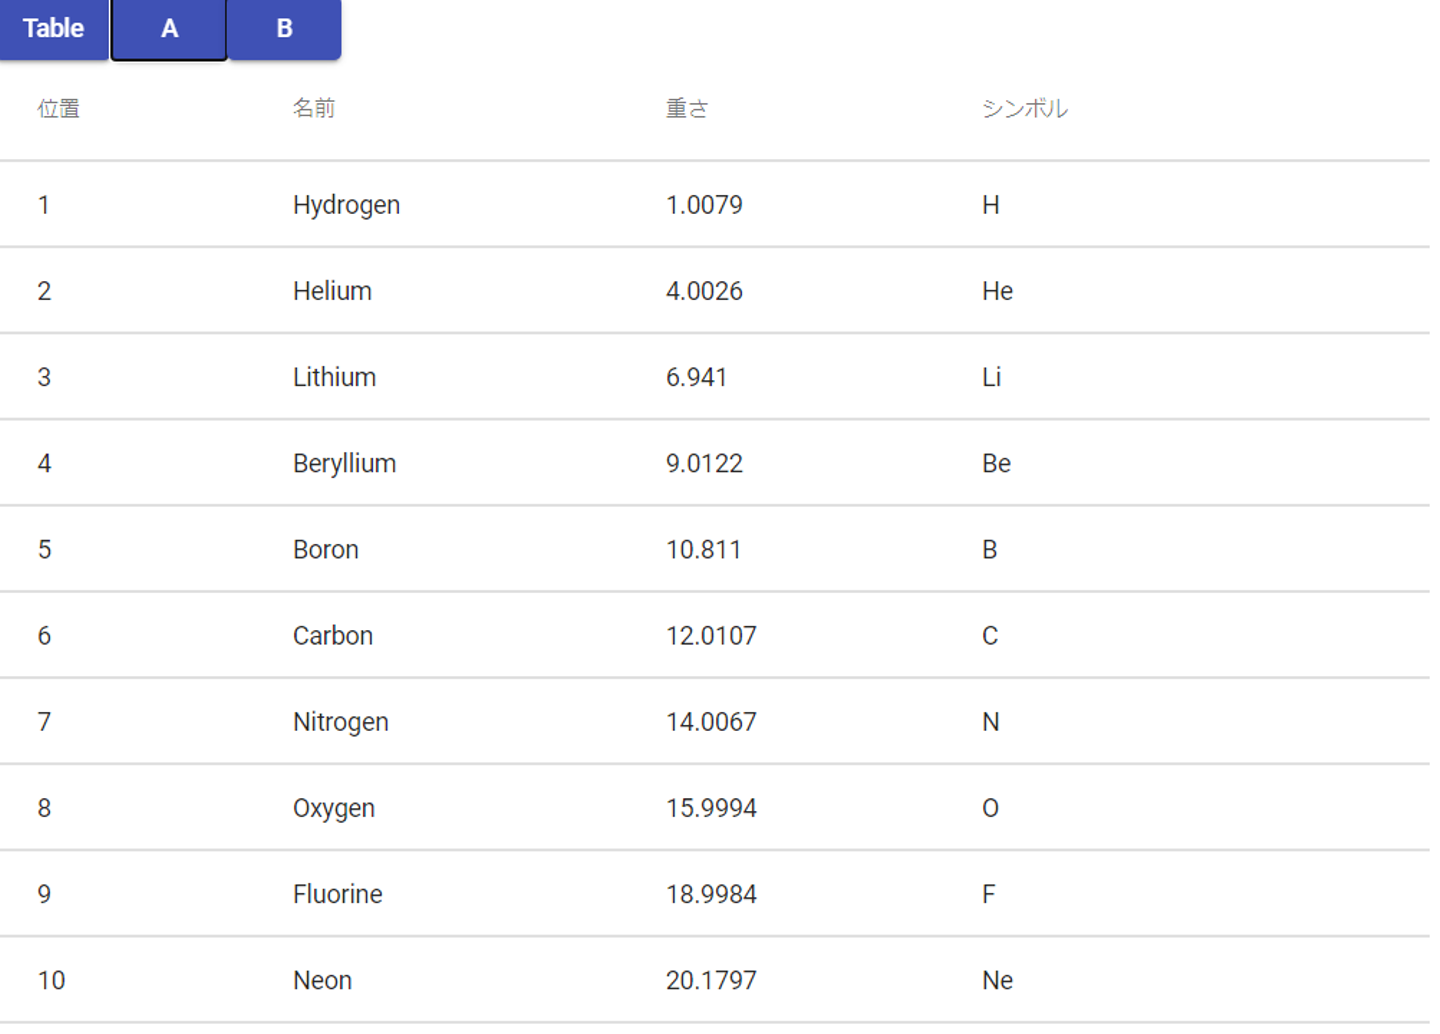
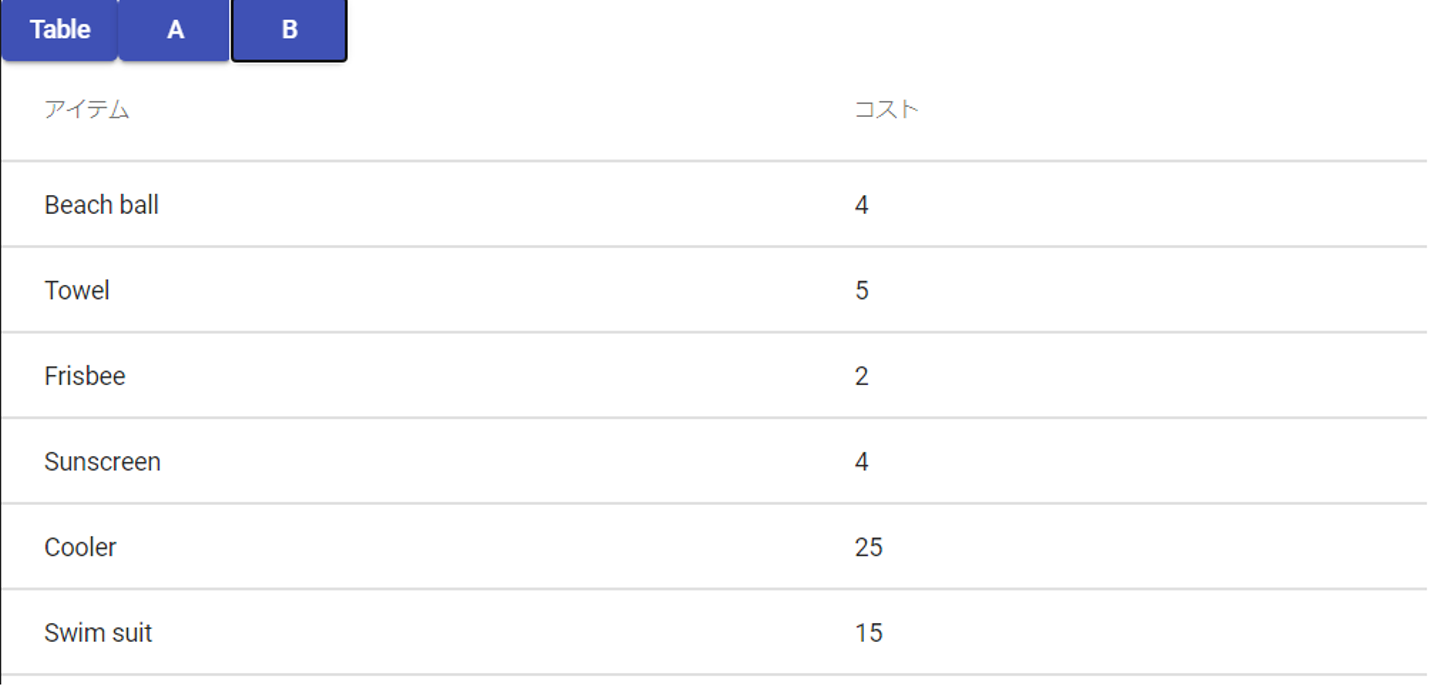
上記コードで実装した画面を表示します。
画像上部の A、B ボタンを押すことにより表示するデータ構造を変更します。

図 1 テーブル A

図 2 テーブル B
あとがき
本記事ではパスに渡される tableName で表示されるテーブルを変更しましたが、
API のレスポンスにより表示するデータ構造の変更なども可能となります。
また、テーブルに表示する列名と実際のデータから取得する際に使用するキー名が同じ場合であれば
テーブルのカラム定義(Columns 型)も必要なく、データのみで表示可能です。
※2021年7月7日にアーティサンオフィシャルブログに投稿された記事です。
投稿者:木戸裕貴


/assets/images/8107364/original/817ae03e-6e1d-4aec-af6c-7fd37990950e?1636699748)


/assets/images/8152084/original/817ae03e-6e1d-4aec-af6c-7fd37990950e?1637283061)

